The holiday season is upon us, and if you haven’t finished your Christmas cards yet, now’s the perfect time to get started! One of the simplest ways to create beautiful and thoughtful handmade cards is by using your circle dies. Circle dies can elevate your designs with minimal effort, adding interest and dimension to your card while keeping the process easy and stress-free.
In this article, we will show you how to use your circle dies, specifically the Stylish Shapes Dies from Stampin’ Up!, to create a fabulous and elegant Christmas card. We’ll explore the layout, tools, and techniques to help you craft a gorgeous card that feels personal and special.
Why Use Circle Dies for Christmas Cards?

https://www.instagram.com/p/C-NWt65p7-k/?utm_source=ig_web_copy_link
Circle dies are versatile and can be used in countless ways for card making. They add a geometric element that balances out intricate patterns or creates a focal point for your design. The best part is that with just a few simple tools, you can create stunning, professional-looking cards that look anything but basic.
For this project, the Stylish Shapes Dies from Stampin’ Up! are a great choice because they provide a range of circle sizes to fit various design needs. Additionally, the dies have clean edges and a modern aesthetic that works wonderfully for both simple and more elaborate card designs.
Here’s how to use your circle dies to create a fabulous Christmas card:
Supplies You’ll Need
Before we dive into the step-by-step guide, let’s quickly gather the essential supplies needed for this project:
- Stylish Shapes Dies (Stampin’ Up!) – These dies include a range of circle sizes perfect for creating a focal point on your card.
- Merry Melody 3D Embossing Folder (Stampin’ Up!) – This embossing folder adds texture to the background of your card, giving it a beautiful, musical touch that’s ideal for Christmas.
- Cardstock – A neutral base for the card (such as white or cream) along with colored cardstock for accents.
- Christmas Sentiment Stamp – For the greeting. You can use a pre-made stamp or one of your own creations.
- Stampin’ Up! Ink Pads – Choose a color that complements your design. For Christmas, classic red, green, gold, or silver are ideal.
- Adhesive – Use double-sided tape or foam dimensionals for adding dimension to your card.
- Embossing Powder (optional) – If you’d like to add extra sparkle to your sentiment or other details.
- Scissors or Paper Trimmer – For cutting cardstock to size.
Step-by-Step Instructions
1. Prepare Your Card Base
Start by creating your card base. For a standard A2 card, you’ll want to cut a piece of cardstock to 5 ½ inches by 8 ½ inches. Fold it in half to create your card, ensuring you have a crisp fold with a bone folder or your fingers.
You can use a basic white or cream-colored cardstock for the base. This will help your die cuts and other elements stand out and keep the overall design clean and elegant.
2. Emboss Your Background with the Merry Melody Folder
One of the things that will give your card an elegant and festive touch is texture. For this, the Merry Melody 3D Embossing Folder from Stampin’ Up! is a fantastic choice. This folder features a subtle yet detailed musical score design that instantly gives your card a classy, seasonal look.
- Take a piece of cardstock slightly smaller than your card base (about 4 ¼ inches by 5 ½ inches).
- Place it inside the Merry Melody 3D Embossing Folder and run it through your die-cutting machine. The result will be a beautifully textured background that looks like it’s been embossed with delicate musical notes.
- Adhere the embossed piece to the front of your card base using strong adhesive or a tape runner. Center it for a balanced, polished appearance.
3. Die-Cut Your Circles
Next, grab your Stylish Shapes Dies and choose the circles you’ll use for your focal point and sentiment. These dies come in various sizes, so you can mix and match them to suit your design.
- For the focal point of your card, select a medium-sized circle die. Position it over your colored cardstock (I recommend using a traditional Christmas color like red or green) and run it through your die-cutting machine.
- You may also want a smaller circle for your sentiment. In this case, use a die that’s just slightly smaller than the first circle.
Using circle dies allows for a clean, uniform shape that adds visual interest without being overly complicated. Plus, the repetition of the circular form brings a sense of harmony to your design.
4. Stamp Your Sentiment
Once your circles are cut out, it’s time to stamp the sentiment on your smaller circle. Choose a Christmas greeting like “Merry Christmas,” “Season’s Greetings,” or “Happy Holidays.” If you’re using a stamp set, make sure to pick an ink color that will stand out on your cardstock—classic red, green, or gold ink is perfect for the season.
- Ink up your stamp and press it firmly onto your die-cut circle.
- Let the ink dry completely, or if you prefer, you can emboss the sentiment for added texture. Just stamp your sentiment with clear embossing ink, sprinkle it with embossing powder, and heat set it with a heat gun.
For extra flair, consider using metallic ink or adding some sparkle to the sentiment with glitter or embossing powder.
5. Layer Your Circles
Now that you have your circles cut and stamped, it’s time to assemble the design. Start by placing the larger circle on the card front, towards the center or slightly to the side for an asymmetrical look. Use foam dimensionals to pop up the circle for added depth and interest.
Adhere the smaller circle with your sentiment over the larger one. Again, use foam dimensionals to give it some dimension, or simply adhere it flat depending on the effect you want to achieve.
6. Add Final Embellishments
To make your card even more special, consider adding a few finishing touches. You could:
- Add a ribbon or twine around the base of the card for a decorative accent.
- Use small embellishments such as rhinestones, sequins, or pearls for a little sparkle.
- Consider stamping or die-cutting small holiday motifs (such as holly, stars, or snowflakes) to add extra elements around the circles.
The beauty of this design is that it’s so flexible. Whether you want a clean, minimalist look or a more embellished, ornate style, you can customize it with whatever elements suit your taste.
7. Assemble and Send!
Once everything is dry and securely attached, take a moment to appreciate your beautiful work! Your circle-die Christmas card is ready to be sent out to friends and family.
Consider adding a handwritten note inside the card for a personal touch, and remember—there’s no limit to how many variations you can create using this layout. Change up the colors, patterns, and sentiments for a variety of card designs that will surely impress your recipients.
Why This Design Works
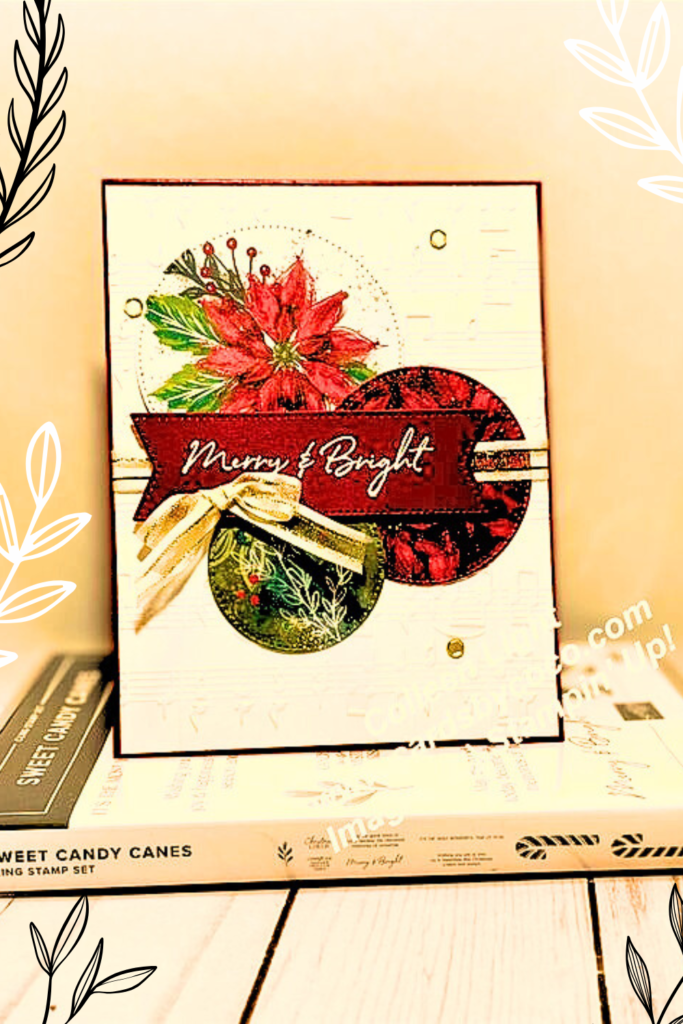
This design is the perfect blend of simplicity and elegance. Using circle dies allows for clean lines and a visually pleasing focal point, while the Merry Melody 3D embossing folder adds texture and holiday cheer without overwhelming the design. The key to this card’s success is in the balance: the background is textured, the sentiment is clear and centered, and the circle dies help create a modern yet timeless aesthetic.
Whether you’re creating a batch of cards for your holiday mailing list or just crafting a few special ones for close friends and family, this design will make a lasting impression. Plus, it’s quick and easy to recreate, so you’ll have your cards finished in no time!
Final Thoughts
Making your own Christmas cards is a rewarding and creative way to show someone you care during the holiday season. By using the Stylish Shapes Dies from Stampin’ Up! and the Merry Melody embossing folder, you can create a beautiful card that’s both easy and elegant. Whether you’re new to card making or an experienced crafter, this layout is sure to bring a smile to your face and to the recipient’s as well.
Happy crafting and merry card making!
