Card-making can be one of the most enjoyable and rewarding crafting activities. Whether you’re creating cards for special occasions or just sending a note to say “hello,” the personal touch of a handmade card always brings a smile. But as much as we love creating beautiful cards, sometimes we don’t have the time for intricate, labor-intensive designs. That’s where quick and easy card layouts come in—especially one as versatile and fun as the “Pretty Paper Strips” layout.
In this article, we’ll explore how to create stunning, easy-to-make cards using pretty paper strips. You can make these cards in no time, even if you’re new to crafting, and you’ll love the end result. Plus, this layout allows you to use up all your scrap pieces of paper—so not only will you have beautiful cards, but you’ll also be cleaning out your paper stash. Win-win!
The Beauty of the “Pretty Paper Strips” Card Layout

The “Pretty Paper Strips” card layout is simple, straightforward, and flexible enough to work with nearly any designer paper you have on hand. Whether you’re using a full sheet of coordinating Designer Series Paper or small scraps left over from other projects, this layout works like a charm. It’s perfect for all skill levels, from beginners to seasoned crafters.
Why You’ll Love This Card Layout
- Uses Scrap Paper: One of the best aspects of this layout is that it’s an excellent way to use up leftover scraps of paper. We all accumulate bits and pieces of beautiful designer paper over time, and this layout gives you a way to put those scraps to good use.
- Customizable: Whether you’re making birthday cards, thank-you notes, holiday greetings, or any other type of occasion card, this layout is extremely adaptable. Simply change the theme of your stamps, colors, and paper, and you have a whole new design ready to go!
- Fast and Simple: The layout uses minimal cutting, and the assembly process is quick, making this perfect for mass production of cards. This is especially useful when you need to create several cards at once for a holiday or special event.
- Elegant Results: Despite its simplicity, the finished card looks polished and professional. The beauty of the paper strips creates a modern, clean aesthetic, and you can add just enough embellishment to make it stand out.
Materials Needed for Pretty Paper Strips Cards
To get started, you’ll need just a few basic materials. Here’s a list of what to gather:
- Cardstock: For the base of the card (typically 8.5” x 5.5” folded in half for a standard A2-sized card)
- Designer Series Paper: Three strips, each measuring 1” x 4”. These can be any coordinating patterned paper, or you can mix and match different colors and patterns.
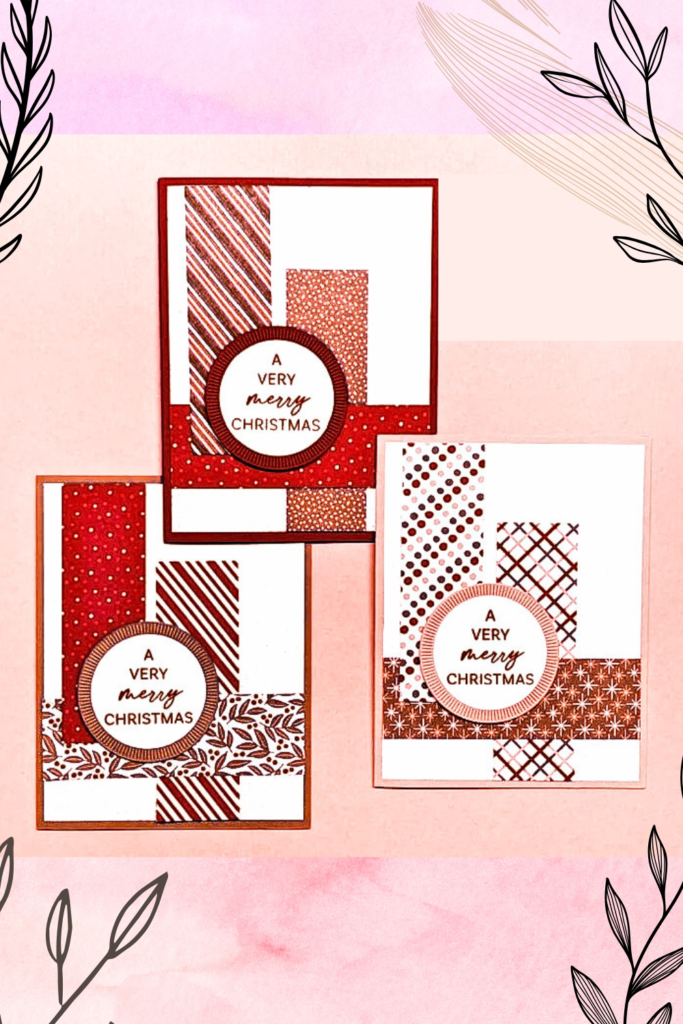
- Stamps: Choose a sentiment or image for the front of the card. This could be something like “Merry Christmas,” “Happy Birthday,” “Thank You,” or any other occasion you have in mind.
- Ink Pads: Select colors that complement your paper.
- Embellishments (optional): Ribbon, rhinestones, sequins, or buttons to add a little extra sparkle.
- Adhesive: Liquid glue or double-sided tape to secure your strips and sentiment.
- Bone Folder (optional): For creating crisp folds in your card.
Step-by-Step Guide to Making Pretty Paper Strips Cards
This is where the magic happens! Follow these simple steps to create your own quick and easy cards with beautiful paper strips:
Step 1: Prepare the Card Base
Start by cutting your cardstock to measure 8.5” x 5.5”. Then, score it at 4.25” to fold it in half. This gives you a standard A2-sized card, which is the perfect size for most greeting cards.
Use a bone folder to press down the fold for a sharp, clean crease. Set your card base aside.
Step 2: Cut Your Designer Series Paper Strips
Next, you’ll need three 1” x 4” strips of designer paper. These strips can all be from the same design or from different patterns, depending on your preference. Make sure the colors coordinate well together to create a harmonious look.
If you’re using scraps, this is a great time to dig into your stash. Mix and match colors and patterns to create a fun, unique card every time.
Step 3: Arrange the Strips on the Card
Now comes the fun part! Arrange your three 1” x 4” strips across the front of the card. You can place them either horizontally or vertically, depending on your design preference. Here are a few layout options:
- Horizontal Placement: Place all three strips horizontally across the center of the card, with equal spacing between them. This classic layout works beautifully and gives you a balanced look.
- Diagonal or Angled Placement: For a more dynamic, playful design, arrange the strips at an angle, creating a more modern look.
- Vertical Strips: Another option is to stack the strips vertically, either in the center or towards the left or right side of the card. This can be especially striking if you use contrasting paper designs.
Step 4: Adhere the Paper Strips
Once you’re happy with the layout, use adhesive to secure the strips to the front of the card. Apply glue or tape to the back of each strip and place them on the card one at a time. Be sure to leave just a small amount of space between each strip for a clean, crisp look.
Step 5: Stamp Your Sentiment
Next, stamp your chosen sentiment in the center of the card or just above the paper strips. A simple phrase like “Merry Christmas,” “Sending Love,” or “Thank You” works perfectly. Use an ink color that contrasts nicely with your paper to make sure the sentiment stands out.
If you want to get creative, you can also add a small stamped image—like a Christmas tree, snowflake, or flower—next to your sentiment. Make sure that the sentiment and any additional images don’t overwhelm the design but rather complement the overall aesthetic.
Step 6: Add Embellishments (Optional)
This is your chance to make the card truly shine! You can embellish it with a few rhinestones, sequins, or pearls for added texture and sparkle. A small piece of ribbon can also be tied around the card or used as a bow to accentuate the design.
If you’re making cards for a particular occasion, such as Christmas, you could add some tiny Christmas tree die-cuts or snowflake stickers. Keep the embellishments to a minimum so as not to overpower the simplicity of the paper strips.
Step 7: Finishing Touches
Once your strips and sentiment are in place, let the card dry completely if you’ve used any wet adhesive. You can also add a liner to the inside of the card (using Basic White cardstock cut to 4” x 5.25”) to write a personalized message.
More Variations and Ideas

https://www.instagram.com/p/Cz9r9B0RwAY/?utm_source=ig_web_copy_link&igsh=MzRlODBiNWFlZA==
This simple layout is incredibly versatile and can be adapted for almost any occasion or style. Here are some ideas to expand on the basic design:
1. Themed Variations
- For Christmas cards, use traditional red, green, and gold papers. Add a stamp of a Christmas tree or holly to the center.
- For birthday cards, use fun, bright colors and a playful sentiment like “Celebrate” or “Wishing You the Best!”
- For thank-you cards, try using floral or pastel prints and a heartfelt sentiment like “Thank You So Much” or “Grateful for You.”
2. Mix Patterns
You can create even more interest by mixing different patterns in each strip. For example, pair stripes with polka dots, or florals with geometric prints. The key is to balance your design with coordinating colors.
3. Layering for Extra Dimension
If you want to add more depth to your card, consider layering your paper strips on a slightly larger mat of solid-colored cardstock. This will frame the design and make the strips pop even more.
Conclusion
Creating quick and easy cards with pretty paper strips is an excellent way to craft beautiful, personalized greetings without spending hours on each design. This layout is simple enough for beginners but versatile enough to keep seasoned crafters engaged. With just a few supplies, you can create stunning cards for any occasion, all while using up those scraps of designer paper you’ve been saving. So, next time you’re looking for a simple yet elegant card idea, give the “Pretty Paper Strips” layout a try. You’ll be amazed at how quickly you can create a stack of gorgeous cards, ready for any occasion!
